
Como prestar primeiros socorros ao seu cão
 Brincando de veterinário com seu cachorro?
 Você já viu um cachorro ferido em uma briga ou atropelado por um carro? Talvez você pudesse apenas balançar a cabeça e ir embora. Não porque você não se importou, mas porque você não sabia como abordar e examinar o cão ou o que fazer em seguida. Especialmente se você tem um cachorro, você vai querer estar preparado, pois seu cachorro depende de você para ajuda em uma situação de emergência.
Este artigo fornecerá as informações e técnicas necessárias para administrar os primeiros socorros com confiança e talvez salvar a vida de um animal de estimação. Da administração de RCP ao tratamento de uma picada de inseto, você aprenderá a lidar com uma ampla variedade de emergências caninas.
Vamos começar aprendendo como conter adequadamente um cão ferido e assustado, pois esta será a primeira ordem de negócios para tratar a maioria dos ferimentos em cães.
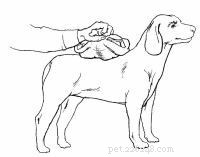
Contendo um cão ferido
Um cão ferido geralmente está assustado e com dor e, a menos que se sinta muito seguro com sua presença, ele pode tentar escapar ou até mordê-lo. Portanto, é importante usar as dicas a seguir ao abordar um cão ferido.
Etapa 1: Aproxime-se do cão lentamente, falando em um tom de voz tranquilizador.
Etapa 2: Aproxime-se do cão sem tocá-lo.
Etapa 3: Abaixe-se para o cachorro. Enquanto continua a falar, observe seus olhos e expressão facial.
Etapa 3a: Se o cão estiver com os olhos arregalados e rosnando, NÃO tente acariciá-lo. Prossiga para a Etapa 4.
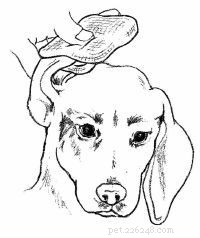
Etapa 3b: Se o cão estiver tremendo, com a cabeça abaixada e uma aparência "sorridente" na boca, faça carinho no cão para tranquilizá-lo, primeiro sob a mandíbula. Se isso for permitido, acaricie o cão na cabeça.
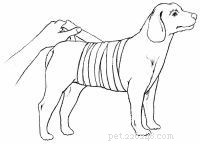
Etapa 4: Coloque uma coleira no pescoço do cachorro. Use qualquer material disponível - uma corda, uma gravata, um cinto ou trapos rasgados.
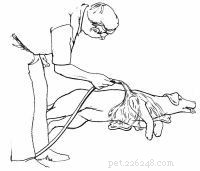
Etapa 5: Se estiver sozinho, coloque a trela em torno de um objeto fixo, como um poste de cerca. Puxe o cão contra este objeto e amarre a guia para que o cão não possa mover a cabeça.
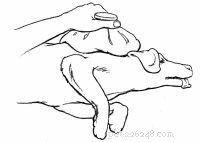
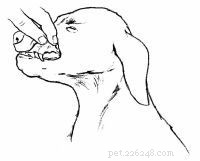
Etapa 6: Açaime o cão para se proteger.
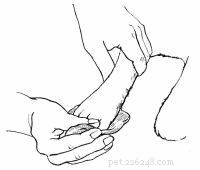
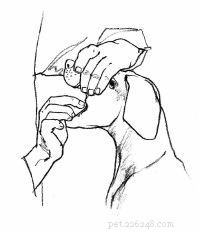
Etapa 6a: Usando um longo pedaço de corda, trapos rasgados ou uma gravata, enrole o focinho do cão e dê um único nó sob o queixo.
Etapa 6b: Traga as pontas da corda, trapos ou amarre atrás das orelhas e amarre-as em um laço.
Etapa 7: Se você estiver sozinho, prossiga para administrar o tratamento.
Se você tiver um assistente
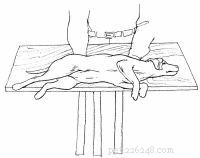
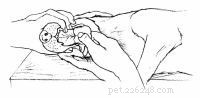
Etapa 8: Se possível, coloque o cão em uma mesa ou outra superfície elevada.
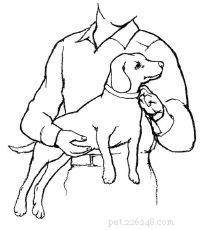
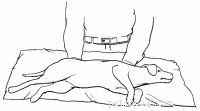
Etapa 8a: Se o cão for pequeno, segure sua coleira com uma mão e coloque o outro braço sobre suas costas e ao redor de seu corpo. Ao mesmo tempo, puxe a coleira para a frente e levante o corpo do cão, embalando-o contra o seu corpo.
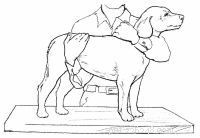
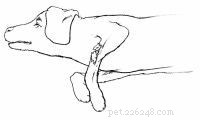
Etapa 8b: Se o cão for grande, deslize um braço por baixo do pescoço, segurando a garganta na dobra do braço. Certifique-se de que o cão pode respirar facilmente. Coloque o outro braço sob o estômago do cão. Levante com os dois braços.
Etapa 8c: Se o cão for muito grande, passe um braço por baixo do pescoço dele, segurando o peito na dobra do braço. Certifique-se de que o cão pode respirar facilmente. Coloque o outro braço sob a garupa do cão e, pressionando os braços um contra o outro, levante o cão.
Etapa 8d: Peça ao seu assistente para administrar o tratamento enquanto você segura o cachorro na mesa.
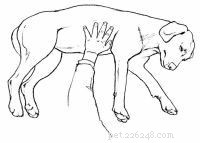
Etapa 9: Se você quer o cachorro de lado:
Etapa 9a: Fique de pé ou ajoelhe-se para que o cão fique na sua frente com a cabeça para a direita.
Etapa 9b: Alcance as costas do cão e segure a perna da frente mais próxima de você com a mão direita e a perna de trás mais próxima de você com a mão esquerda.
Etapa 9c: Empurre as pernas do cão para longe de você e deslize-o pelo seu corpo.
Etapa 9d: Segure ambas as pernas dianteiras com a mão direita e ambas as pernas traseiras com a mão esquerda.
Etapa 9e: Segure o pescoço do cão suavemente com o braço direito.
Etapa 9f: Peça ao seu assistente para administrar o tratamento.
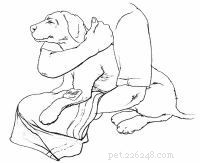
Etapa 10: Se você quer o cachorro sentado:
Etapa 10a: Deslize um braço sob o pescoço do cachorro, segurando sua garganta na dobra do seu braço. Certifique-se de que o cão pode respirar facilmente.
Etapa 10b: Coloque o outro braço sobre as costas do cão e em volta do estômago.
Etapa 10c: Pressionando o cão contra o seu corpo, aplique o peso do corpo nos quartos traseiros do cão.
Etapa 10d: Peça ao seu assistente para administrar o tratamento.
Etapa 11: Se você quer o cachorro em pé:
Etapa 11a: Deslize um braço sob o pescoço do cachorro, segurando sua garganta na dobra do seu braço. Certifique-se de que o cão pode respirar facilmente.
Etapa 11b: Coloque o outro braço sob o estômago do cão.
Etapa 11c: Pressione o cão em direção ao seu corpo e levante-o.
Etapa 11d: Peça ao seu assistente para administrar o tratamento.
Aprender a conter um cão irá ajudá-lo em quase todas as situações de emergência de animais de estimação. Agora vamos dar uma olhada em como transportar esse cão ferido para o veterinário.
Fundamentos do Kit de Primeiros Socorros
Os donos de animais de estimação devem ter os seguintes itens à mão para emergências de cães.
consulte Mais informação
Como transportar um cão ferido
Depois de imobilizar o cão ferido, leve-o a um veterinário o mais rápido possível. Tente não mover um cão ferido mais do que o necessário e peça a alguém que ligue para o veterinário para ter certeza de que ele está preparado para sua chegada. Enquanto isso, use as dicas a seguir para ajudá-lo a transportar seu animal de estimação com o máximo cuidado.
Se o cão puder ser levantado
Etapa 1: Se o cão for pequeno:
Etapa 1a: Segure o colarinho com uma mão e coloque o outro braço sobre as costas e ao redor do corpo.
Etapa 1b: Ao mesmo tempo, puxe a coleira para a frente e levante o corpo do cão, embalando-o contra o seu corpo.
Etapa 2: Se o cão for grande:
Etapa 2a: Deslize um braço sob seu pescoço, segurando sua garganta na dobra de seu braço. Certifique-se de que o cão pode respirar facilmente.
Etapa 2b: Coloque o outro braço sob o estômago do cão. Levante com os dois braços.
Etapa 3: Se o cão for muito grande, passe um braço por baixo do pescoço dele, segurando o peito na dobra do braço. Certifique-se de que o cão pode respirar facilmente. Coloque o outro braço sob a garupa do cão e, pressionando os braços um contra o outro, levante o cão.
Etapa 4: Leve o cão ao veterinário.
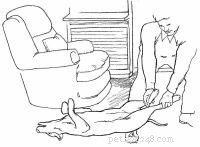
Se o cachorro precisar de uma maca
Uma prancha plana deve ser usada se houver suspeita de fratura nas costas.
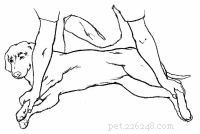
Etapa 1: Use um cobertor ou prancha plana como maca. Se estiver usando uma prancha, vá para a Etapa 2. Se estiver usando um cobertor:
Etapa 1a: Coloque uma mão sob o peito do cão e a outra sob o traseiro; cuidadosamente levante ou deslize o cão sobre o cobertor.
Etapa 1b: Leve o cão ao veterinário.
Etapa 2: Se você estiver usando uma placa plana:
Etapa 2a: Dependendo do tamanho do cachorro, use uma folha de mesa, uma tábua de passar roupa, uma grande tábua de cortar ou uma estante removível. Certifique-se de que o que você usa vai caber no seu carro.
Etapa 2b: Coloque 2 ou 3 longas tiras de pano ou corda equidistantes sob a prancha, evitando a área onde o pescoço do cão vai descansar.
Etapa 2c: Coloque uma mão sob o peito do cão e a outra sob o traseiro; levante ou deslize cuidadosamente o cão sobre a prancha.
Etapa 2d: Amarre o cachorro na tábua.
Etapa 2e: Leve o cão ao veterinário.
Outra técnica que pode ser útil em muitas situações de primeiros socorros é dar medicação oral ao seu animal de estimação. Consulte a próxima página para obter algumas dicas úteis sobre a administração de medicamentos.
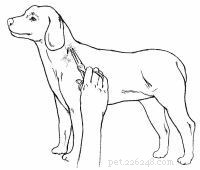
Como administrar medicação oral a um cão
Se você precisa administrar medicação para a dor após uma lesão grave ou é apenas a hora da pílula mensal do dirofilariose do seu animal de estimação, aprender a administrar facilmente a medicação oral a um cão é um truque útil para saber. Use as dicas a seguir para ajudá-lo a dar medicamentos líquidos ou comprimidos ao seu cão.
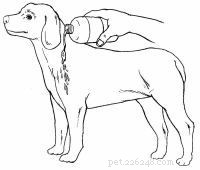
Líquidos
Etapa 1: Contenha o cão. Se o cão for difícil de manusear, você pode precisar de ajuda para contê-lo.
Etapa 1a: Alivie a apreensão do cão falando baixinho e tranquilizando-o.
Etapa 1b: Deslize um braço sob o pescoço do cão, segurando sua garganta suavemente na dobra do seu braço. Certifique-se de que o cão pode respirar facilmente.
Etapa 1c: Passe o outro braço por cima ou por baixo do meio do cão, usando uma pressão suave, mas firme, para segurar o corpo dele contra o seu.
Etapa 1d: Se necessário, aplique um prendedor de boca frouxamente para que haja apenas um leve movimento da mandíbula.
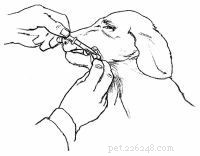
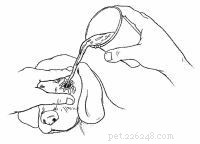
Etapa 2: Incline suavemente a cabeça do cão ligeiramente para trás.
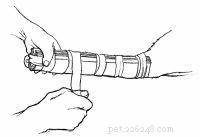
Etapa 3: Puxe o lábio inferior do cão para fora no canto para fazer uma bolsa.
Etapa 4: Usando um conta-gotas de plástico ou uma seringa doseadora, coloque o líquido um pouco de cada vez na bolsa, permitindo que cada pequena quantidade seja engolida antes de administrar mais a dose.
Etapa 5: Esfregue suavemente a garganta do cão para estimular a deglutição.
Pílulas
Etapa 1: Contenha o cão. Se o cão for difícil de manusear, você pode precisar de ajuda para contê-lo.
Etapa 1a: Alivie a apreensão do cão falando baixinho e tranquilizando-o.
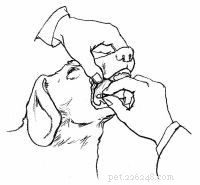
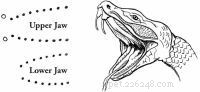
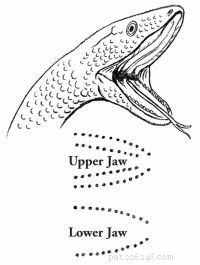
Etapa 2: Segure a mandíbula superior do cão com uma mão sobre o focinho.
Etapa 3: Pressione os lábios do cão sobre os dentes superiores pressionando o polegar de um lado e os dedos do outro para que os lábios do cão fiquem entre os dentes e os dedos. Aplique uma pressão firme para forçar a boca aberta.
Etapa 4: Segure a pílula entre o polegar e o dedo indicador da outra mão e coloque a pílula o mais atrás possível na boca do cão.
Etapa 5: Esfregue suavemente a garganta do cão para estimular a deglutição.
Um método alternativo é esconder a pílula em queijo, manteiga de amendoim ou outro deleite gostoso.
Sangue em um cão pode ser um sinal de uma lesão grave ou apenas um pequeno corte na pata. Na próxima seção, discutiremos como identificar os vários sinais e o que fazer para ajudar um animal de estimação sangrando.
Como tratar um cão sangrando
As patas e pernas de um cão são vulneráveis a ferimentos de vidro quebrado, pregos e outros objetos pontiagudos, e sangrarão muito quando cortadas. Uma orelha ferida também sangra muito porque a pele sobre a orelha é muito fina.
Com qualquer lesão hemorrágica, o principal objetivo dos primeiros socorros é evitar a perda excessiva de sangue, o que pode levar ao choque. Os sinais de choque incluem gengivas pálidas ou brancas, batimentos cardíacos acelerados ou respiração rápida. Se alguma ferida estiver jorrando sangue, significa que uma artéria foi cortada. Isso requer atenção profissional imediata.
Como você cuida do seu cão dependerá da localização e extensão do sangramento. As seguintes dicas de cuidados com cães irão ajudá-lo a aplicar os primeiros socorros em várias áreas do corpo.
Cabeça ou tronco sangrando do cão
Etapa 1: Conter o cão, se necessário.
Etapa 1a: Aproxime-se do cão lentamente, falando em um tom de voz tranquilizador.
Etapa 1b: Deslize uma coleira em volta do pescoço do cão, em seguida, coloque a coleira em torno de um objeto fixo. Puxe o cão contra este objeto e amarre a guia para que o cão não possa mover a cabeça.
Etapa 1c: Açaime o cão para se proteger.
Etapa 2: Cubra a ferida com uma compressa de gaze estéril, toalha limpa dobrada ou absorvente higiênico.
Etapa 3: Enrole trapos rasgados ou outro material macio ao redor do curativo e amarre ou prenda com fita apenas o suficiente para manter o curativo no lugar.
Etapa 4: Transporte o cão imediatamente ao veterinário.
Perna, pata ou cauda sangrando do cão
Etapa 1: Conter o cão, se necessário.
Etapa 1a: Aproxime-se do cão lentamente, falando em um tom de voz tranquilizador.
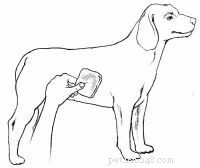
Etapa 2: Prenda o cabelo ao redor da área lesionada.
Etapa 3: Examine a ferida em busca de vidro ou outros objetos estranhos. Se visível, remova o objeto com os dedos ou uma pinça. Se o tecido sob a ferida parecer passar quando você mover a pele, a ferida provavelmente precisará de pontos.
Etapa 4: Lave bem a ferida com água limpa. Evite antissépticos caseiros, que podem causar dor quando aplicados.
Etapa 5: Cubra a ferida com um pano limpo, curativo estéril ou absorvente higiênico.
Etapa 6: Coloque a mão sobre o curativo e pressione com firmeza.
Etapa 7: Mantenha a pressão sobre o curativo para parar o sangramento. Se o sangue penetrar no curativo, NÃO o remova. Aplique mais curativo e continue a aplicar pressão até que o sangramento pare. Se o sangramento não parar em 5 minutos, continue a aplicar pressão na ferida enquanto transporta o cão ao veterinário.
Etapa 8: Enrole trapos rasgados ou outro material macio ao redor do curativo e amarre ou prenda com fita apenas o suficiente para manter o curativo. Comece abaixo da ferida e enrole para cima.
Etapa 9: Se a ferida for profunda o suficiente para exigir pontos, mantenha o cão longe da perna ferida e transporte imediatamente seu animal de estimação ao veterinário.
Peito ou abdômen sangrando do cão
Etapa 1: Conter o cão, se necessário.
Etapa 1a: Aproxime-se do cão lentamente, falando em um tom de voz tranquilizador.
Etapa 1b: Açaime o cão para se proteger.
Etapa 2: Se o ferimento for no peito e for ouvido um ruído de "sucção", enfaixe o ferimento com força suficiente para impedir a entrada de ar e transporte o cão imediatamente ao veterinário. Se não, vá para a Etapa 3.
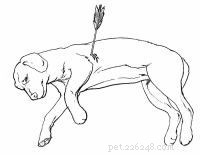
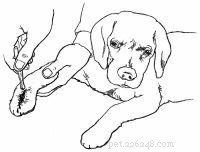
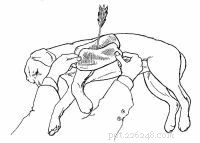
Etapa 3: Se houver um objeto saliente, como uma flecha, NÃO tente removê-lo. Caso contrário, vá para a Etapa 4.
Etapa 3a: Coloque panos limpos, curativos estéreis ou absorventes higiênicos ao redor do ponto de entrada.
Etapa 3b: Enfaixe firmemente ao redor do ponto de entrada.
Etapa 3c: Transporte o cão imediatamente ao veterinário.
Etapa 4: Prenda o cabelo ao redor da área lesionada.
Etapa 5: Examine a ferida em busca de vidro ou outros objetos estranhos. Se visível, remova o objeto com os dedos ou uma pinça. Se o tecido sob a ferida parecer passar quando você mover a pele, a ferida provavelmente precisará de pontos.
Etapa 6: Lave bem a ferida com água limpa.
Etapa 7: Cubra a ferida com um pano limpo, curativo estéril ou absorvente higiênico.
Etapa 8: Coloque a mão sobre o curativo e pressione com firmeza.
Etapa 9: Mantenha pressão sobre o curativo para parar o sangramento. Se o sangue penetrar no curativo, NÃO o remova. Aplique mais curativo e continue a aplicar pressão até que o sangramento pare.
Etapa 10: Enrole lençóis rasgados ou outro material macio ao redor do curativo e amarre ou prenda com fita apenas o suficiente para manter o curativo.
Etapa 11: Se a ferida for profunda o suficiente para exigir pontos, transporte o cão imediatamente ao veterinário.
Orelha sangrando do cão
Etapa 1: Conter o cão, se necessário.
Etapa 1a: Aproxime-se do cão lentamente, falando em um tom de voz tranquilizador.
Etapa 1b: Açaime o cão para se proteger.
Etapa 2: Cubra a ferida com um pano limpo, curativo estéril ou absorvente higiênico. Coloque o material de curativo em ambos os lados da aba da orelha, depois dobre-o sobre o topo da cabeça do cão e segure firmemente para controlar o sangramento.
Etapa 3: Enrole lençóis ou trapos rasgados ao redor do curativo, orelha e cabeça, certificando-se de que toda a orelha esteja coberta. Prenda ou amarre o curativo no lugar.
Etapa 4: Transporte o cão imediatamente ao veterinário.
Unhas sangrando de cachorro
Uma unha quebrada ou cortada muito curta são as razões mais comuns para uma unha sangrando. Certifique-se de levar seu cão ao tosador se você não se sentir confortável cortando suas unhas.
Se a unha estiver quebrada:
Etapa 1: Conter o cão, se necessário.
Etapa 1a: Aproxime-se do cão lentamente, falando em um tom de voz tranquilizador.
Etapa 2: NÃO tente cortar ou remover a unha quebrada sem amordaçar o cão.
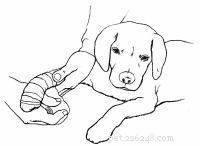
Etapa 3: Segure um pano limpo, curativo estéril ou absorvente higiênico contra a unha. O sangramento vai parar em alguns minutos.
Etapa 4: Transporte o cão ao veterinário o mais rápido possível.
Se a unha for cortada muito curta:
Etapa 1: Conter o cão, se necessário.
Etapa 1a: Aproxime-se do cão lentamente, falando em um tom de voz tranquilizador.
Etapa 1b: Deslize uma coleira em volta do pescoço do cão, em seguida, coloque a coleira em torno de um objeto fixo. Puxe o cão contra este objeto e amarre a guia para que o cão não possa mover a cabeça.
Etapa 1c: Açaime o cão para se proteger.
Etapa 2: Segure um pano limpo, curativo estéril ou absorvente higiênico contra a unha.
Etapa 3: Mantenha uma pressão firme sobre a área por pelo menos 5 minutos. NÃO remova o curativo até que o sangramento pare.
Etapa 4: Se o sangramento não parar em 15 a 20 minutos, transporte o cão ao veterinário o mais rápido possível. O sangramento contínuo indica um distúrbio hemorrágico que deve ser tratado imediatamente.
Sangramento interno
A hemorragia interna é sempre uma emergência. Os sinais de sangramento interno são gengivas pálidas ou brancas; batimento cardíaco rápido ou respiração; e sangramento dos ouvidos, nariz, boca ou reto. As etapas a seguir irão ajudá-lo a tratar o cão para qualquer choque potencial e transportar o cão para ajuda profissional imediatamente.
Etapa 1: Se houver sangramento de qualquer ferida externa, trate de choque.
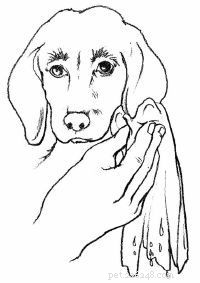
Etapa 1a: Examine as gengivas levantando suavemente o lábio superior para que a gengiva fique visível. Gengivas pálidas ou brancas indicam que o cão está quase certamente em choque e pode ter ferimentos internos graves e/ou sangramento. Se as gengivas estiverem rosadas, o cão provavelmente não está em choque.
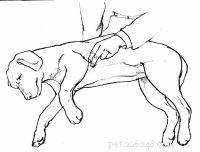
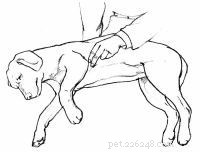
Etapa 1b: Determinar o batimento cardíaco. Coloque os dedos firmemente no cão cerca de 5 centímetros atrás do cotovelo do cão no centro do peito. Conte o número de batimentos em 10 segundos e multiplique por 6. Se o cão estiver em choque, seu batimento cardíaco pode ser superior a 150 batimentos por minuto.
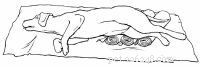
Etapa 2: Coloque o cão de lado com a cabeça estendida.
Etapa 3: Puxe suavemente a língua do cão para manter as vias aéreas abertas.
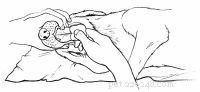
Etapa 4: Eleve ligeiramente os quartos traseiros do cão, colocando-os em um travesseiro ou toalhas dobradas.
Etapa 5: Para conservar o calor do corpo, envolva o cão em um cobertor ou jaqueta.
Etapa 6: Transporte o cão imediatamente ao veterinário.
O inchaço é uma condição séria que pode causar a morte súbita de um cão. Na próxima seção, discutiremos os sinais de inchaço e o que fazer se você suspeitar que seu animal de estimação está sofrendo com isso.
Como tratar um cachorro inchado
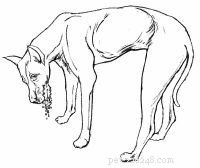
É difícil aceitar o fato de que um cão aparentemente saudável pode, em uma hora, estar lutando por sua vida. O inchaço é uma condição extremamente grave e potencialmente fatal. O tratamento profissional é urgente e não deve ser adiado.
O inchaço parece afetar cães grandes e de peito profundo mais do que outras raças. Os sintomas são dramáticos e inconfundíveis e incluem salivação excessiva, estimulação e agitação; um abdômen aumentado; e freqüentes tentativas de vômito, o que produz grandes quantidades de espuma branca ou nada.
Não há explicação científica satisfatória sobre por que o inchaço ocorre. Basicamente, o estômago se enche de gás, como um balão inflado. Mas com o balão há espaço para expansão. Com o estômago não há, então o gás exerce pressão sobre o baço, fígado e outros órgãos internos.
Se você suspeitar que seu animal de estimação está sofrendo de inchaço, leve-o imediatamente ao veterinário. O inchaço é frequentemente seguido por torção gástrica (viragem do estômago), que leva ao choque e à morte em questão de algumas horas.
Para evitar o inchaço e a torção subsequente, alimente o cão com pequenas refeições várias vezes ao dia, em vez de uma refeição grande, e evite exercícios pesados após as refeições.
Verifique a próxima seção para obter conselhos sobre o que fazer se seu animal de estimação tiver uma perna quebrada, incluindo como colocar uma tala.
Como tratar um cachorro com uma perna quebrada
Com os cães, como com os seres humanos, todos os ossos estão sujeitos a fraturas, mas as fraturas nas pernas são de longe as mais comuns. É importante lembrar que os cães têm uma alta tolerância à dor e muitas vezes uma perna pendurada parece não causar dor. Portanto, não tenha medo de manusear o membro fraturado (mas seja gentil!). O cão vai deixar você saber se dói.
Alguns sinais a serem observados incluem uma perna que parece deformada, pendurada frouxamente, não pode suportar o peso do corpo e está inchada. Fique atento também aos sinais de choque, que incluem gengivas pálidas ou brancas, batimentos cardíacos acelerados ou respiração acelerada.
Para cuidar adequadamente do osso quebrado do seu cão, use as dicas a seguir.
Etapa 1: Conter o cão, se necessário.
Etapa 1a: Aproxime-se do cão lentamente, falando em um tom de voz tranquilizador.
Etapa 1b: Deslize uma coleira em volta do pescoço do cão, em seguida, coloque a coleira em torno de um objeto fixo. Puxe o cão contra este objeto e amarre a guia para que o cão não possa mover a cabeça.
Etapa 1c: Açaime o cão para se proteger.
Etapa 2: Examine a perna e determine se a fratura está aberta (ferida perto da fratura ou osso saindo da pele) ou fechada (sem fratura na pele).
Etapa 3: Se a fratura estiver fechada, vá para a Etapa 4. Se a fratura estiver aberta:
Etapa 3a: Lave bem a ferida com água limpa.
Etapa 3b: Cubra a ferida com um curativo estéril, pano limpo ou absorvente higiênico.
Etapa 3c: NÃO tente imobilizar a fratura. Segure uma grande toalha dobrada sob o membro sem tala e transporte o cão imediatamente ao veterinário.
Etapa 4: Se o membro quebrado estiver muito deformado ou o cão parecer estar com muita dor quando você tentar colocar a tala, pare e prossiga para a Etapa 5. Caso contrário, prossiga com a tala no osso.
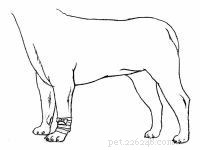
Etapa 4a: Use qualquer material de tala disponível - paus, jornal, revista ou papelão rígido. O objetivo é imobilizar o membro e não reiniciá-lo.
Etapa 4b: Prenda as talas na perna fraturada com tiras rasgadas de pano ou gaze.
Etapa 4c: Prenda ou amarre as tiras com firmeza, mas não com tanta força que a circulação possa ser prejudicada.
Etapa 4d: Transporte o cão imediatamente ao veterinário.
Etapa 5: Se o membro quebrado estiver muito deformado ou o cão parecer estar com muita dor quando você tentar colocar a tala, segure uma toalha grande sob o membro sem tala para apoio e transporte o cão imediatamente ao veterinário.
Esteja preparado para queimaduras em seu animal de estimação, verificando as dicas na próxima seção.
Como tratar um cachorro queimado
Os cães adoram estar sob os pés enquanto seus donos estão cozinhando. Embora isso possa ser uma característica admirável do melhor amigo do homem, também pode ser perigoso quando água fervente ou óleo de cozinha quente está sendo usado na cozinha.
Um cão pode sofrer queimaduras de primeiro, segundo ou terceiro grau causadas por fogo, calor, líquidos ferventes, produtos químicos e eletricidade. Todos são dolorosos e podem causar danos, até mesmo a morte. As queimaduras superficiais, evidenciadas por dor e vermelhidão da pele, geralmente não são graves. No entanto, os primeiros socorros devem ser dados o mais rápido possível para aliviar a dor.
As dicas a seguir o ajudarão não apenas a identificar o tipo de queimadura com o qual você está lidando, mas também lhe darão sugestões sobre a melhor forma de tratar a lesão.
Queimaduras de primeiro ou segundo grau
Os sinais de uma queimadura de primeiro grau incluem pele intacta ou chamuscada, lesões dolorosas ou pele vermelha com possíveis bolhas. Os sinais de uma queimadura de segundo grau são pelos chamuscados ou lesões dolorosas que ficam bronzeadas com inchaço e bolhas. Se você notar algum desses sinais de alerta, veja o que fazer:
Etapa 1: Conter o cão, se necessário.
.
Etapa 2: Aplique água fria ou compressas de gelo na área queimada e deixe em contato com a pele por 15 minutos. NÃO aplique pomada ou manteiga.
Etapa 3: Se as queimaduras cobrirem uma grande parte do corpo do cão ou estiverem localizadas onde o cão possa lambê-las, cubra a área com um curativo estéril. NÃO use algodão.
Etapa 4: Enrole trapos rasgados ou outro material macio ao redor do curativo e amarre ou prenda com fita apenas o suficiente para mantê-lo no lugar.
Etapa 5: Transporte o cão ao veterinário o mais rápido possível.
Queimaduras de terceiro grau
Os sinais de uma queimadura de terceiro grau incluem destruição em toda a área da pele, lesões pretas ou brancas puras ou pele que se solta facilmente. Observe também os sinais de choque, que incluem gengivas pálidas ou brancas, batimentos cardíacos acelerados ou respiração rápida. Se você notar esses sinais, veja o que fazer:
Etapa 1: Conter o cão, se necessário.
Etapa 1a: Aproxime-se do cão lentamente, falando em um tom de voz tranquilizador.
Etapa 2: Examine o cão para choque. Se ele ou ela não estiver em choque, prossiga para a Etapa 3.
Etapa 2a: Examine as gengivas levantando suavemente o lábio superior para que a gengiva fique visível. Gengivas pálidas ou brancas indicam que o cão está quase certamente em choque. Se as gengivas estiverem rosadas, o cão provavelmente não está em choque.
Etapa 2b: Determinar o batimento cardíaco. Coloque os dedos firmemente no cão cerca de 2 polegadas atrás do cotovelo do cão no centro do peito. Conte o número de batimentos em 10 segundos e multiplique por 6. Se o cão estiver em choque, seu batimento cardíaco pode ser superior a 150 batimentos por minuto.
Etapa 2c: Coloque o cão de lado com a cabeça estendida. Puxe suavemente a língua do cão para manter as vias aéreas abertas.
Etapa 2d: Eleve ligeiramente os quartos traseiros do cão, colocando-os em um travesseiro ou toalhas dobradas. Para conservar o calor do corpo, envolva o cão em um cobertor ou jaqueta.
Etapa 3: NÃO aplique pomada ou manteiga. Aplique um curativo seco e limpo sobre a área queimada. NÃO use algodão.
Etapa 4: Enrole trapos rasgados ou outro material macio ao redor do curativo e amarre ou prenda com fita apenas o suficiente para mantê-lo no lugar.
Etapa 5: Transporte o cão ao veterinário o mais rápido possível.
Queimaduras Químicas
Os sinais de uma queimadura química incluem um odor químico, como terebintina, gasolina ou inseticida; pele avermelhada; ou dor. Se você notar esses sinais, faça o seguinte:
Etapa 1: Conter o cão, se necessário.
Etapa 1a: Aproxime-se do cão lentamente, falando em um tom de voz tranquilizador.
Etapa 2: Lave bem a área com água e sabão; repita quantas vezes forem necessárias para remover o produto químico. Use sabão neutro e ensaboe bem. NÃO use solventes de qualquer tipo.
Etapa 3: Ligue para o veterinário para mais instruções.
Seu cão se mete em tudo e em qualquer coisa? Consulte a próxima seção para obter dicas de primeiros socorros sobre o tratamento de um cão engasgado, incluindo como desobstruir as vias aéreas e administrar a RCP.
Como tratar um cão engasgado
Quando um cão está engasgado com um objeto estranho, ele precisa de ajuda imediatamente. Quanto mais ele tenta respirar, mais em pânico fica. Seu objetivo nesta situação de emergência é abrir as vias aéreas do cão sem ser mordido.
Os sinais de que um cão está engasgado incluem patas na boca, língua pálida ou azul, angústia óbvia ou inconsciência. Se o cão está inconsciente e você acredita que um objeto estranho está presente, você deve abrir as vias aéreas antes de dar ao cão a ressuscitação cardiopulmonar (RCP). Se o cão não puder respirar, os esforços para reanimá-lo serão infrutíferos.
Embora tudo isso pareça bastante avassalador, você pode ajudar um cão engasgado ou inconsciente seguindo as dicas básicas descritas abaixo. Seus esforços podem salvar a vida de um cão!
Etapa 1: Conter o cão, se necessário.
Etapa 1a: Aproxime-se do cão lentamente, falando em um tom de voz tranquilizador.
Etapa 2: Limpe a via aérea.
Etapa 2a: Abra a boca do cão com cuidado, segurando a mandíbula superior com uma mão sobre o focinho.
Etapa 2b: Pressione os lábios do cão sobre os dentes superiores pressionando o polegar de um lado e os dedos do outro, de modo que os lábios fiquem entre os dentes do cão e os dedos. Aplique uma pressão firme para forçar a boca aberta.
Etapa 2c: Se conseguir ver o objeto, tente removê-lo com os dedos.
Etapa 2d: Se você não conseguir remover o objeto e o cão for pequeno o suficiente, pegue-o segurando suas patas traseiras; vire-o de cabeça para baixo e agite vigorosamente. Bater nas costas enquanto balança pode ajudar a desalojar o objeto.
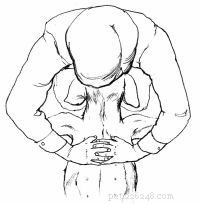
Etapa 2e: Se você não conseguir remover o objeto e o cachorro for muito grande para pegá-lo, coloque-o de lado no chão. Coloque a mão logo atrás da caixa torácica e pressione para baixo e ligeiramente para a frente com rapidez e firmeza. Liberar. Repita rapidamente várias vezes até que o objeto seja expelido.
Etapa 3: Se não conseguir desalojar o objeto, leve o cão imediatamente ao veterinário.
Etapa 4: Se você deslocar o objeto e o cão não estiver respirando, sinta os batimentos cardíacos colocando os dedos cerca de 5 cm atrás do cotovelo do cão no meio do peito.
Etapa 5: Se o coração do cão não estiver batendo, vá para a Etapa 6. Se estiver, faça respiração artificial.

Etapa 5a: Vire o cachorro de lado.
Etapa 5b: Estenda a cabeça e o pescoço do cão. Segure a boca e os lábios do cão fechados e sopre firmemente em suas narinas. Administrar 1 respiração a cada 3 a 5 segundos. Respire fundo e repita até sentir resistência ou ver o peito subir.
Etapa 5c: Após 10 segundos, pare. Observe o peito em busca de movimento para indicar que o cão está respirando por conta própria.
Etapa 5d: Se o cão não estiver respirando, continue a respiração artificial.
Etapa 6: Se o coração não estiver batendo, faça RCP.
CPR para cães com peso até 45 libras
Etapa 6a: Vire o cachorro de costas.
Etapa 6b: Ajoelhe-se na cabeça do cão.
Etapa 6c: Feche as mãos sobre o peito do cão com as palmas das mãos apoiadas em ambos os lados do peito.
Etapa 6d: Comprima as palmas das mãos no peito com firmeza contando "2" e solte contando "1". É necessária uma pressão moderada. Repita cerca de 60 a 90 vezes por minuto.
Etapa 6e: Alternadamente (após 30 segundos), mantenha a boca e os lábios do cão fechados e sopre firmemente em suas narinas. Sopre por 3 segundos, respire fundo e repita até sentir resistência ou ver o peito do cachorro subir. Tente repetir isso 10 a 20 vezes por minuto. Como regra geral, use uma proporção de RCP de cerca de 5 compressões cardíacas para 1 respiração de ar.
Etapa 6f: Após 1 minuto, pare. Olhe para o peito para o movimento da respiração e sinta o batimento cardíaco colocando os dedos cerca de 5 cm atrás do cotovelo do cão no centro do peito.
Etapa 6g: Se o coração do cão não estiver batendo, continue a RCP. Se o coração começar a bater, mas o cão ainda não estiver respirando, volte para o Passo 5.
CPR para cães com peso superior a 45 libras
Etapa 6a: Vire o cachorro de lado.
Etapa 6b: Coloque a palma da sua mão no meio do peito do cão.
Etapa 6c: Pressione para uma contagem de "2" e solte para uma contagem de "1". É necessária uma pressão firme. Repita cerca de 60 a 90 vezes por minuto.
Etapa 6d: Alternadamente (após 30 segundos), mantenha a boca e os lábios do cão fechados e sopre firmemente em suas narinas. Sopre por 3 segundos, respire fundo e repita até sentir resistência ou ver o peito subir. Tente repetir isso 10 a 20 vezes por minuto.
Etapa 6e: Após 1 minuto, pare. Olhe para o peito para o movimento da respiração e sinta o batimento cardíaco colocando os dedos cerca de 5 centímetros atrás do cotovelo do cão no centro do peito.
Etapa 6f: Se o coração do cão não estiver batendo, continue a RCP. Se o coração começar a bater, mas o cão ainda não estiver respirando, volte para o Passo 5.
Etapa 7: Transporte o cão imediatamente ao veterinário. A RCP ou respiração artificial deve ser continuada a caminho do veterinário ou até que o cão esteja respirando e seu coração esteja batendo sem assistência.
Testemunhar uma convulsão pode ser uma coisa assustadora, mas não entre em pânico. Use the tips on the next page to help you if your pet experiences convulsions or seizures.
How to Treat a Dog That Has Convulsions/Seizures
A convulsion or seizure is the result of constant electrical firing of the muscles of the body from the brain. Convulsions are rarely fatal, and most last only a few minutes. A typical seizure is then followed by 15 minutes to a half hour of recovery time, during which period the dog may be dazed and confused.
Not all seizures are due to epilepsy. Some are caused by lead or other poisons, liver diseases, and even brain tumors. Seizures or convulsions should never be taken lightly. The problem should be discussed with your veterinarian as soon as possible.
The most important thing to do if your dog is experiencing a seizure is to protect it from self-injury. Be patient, don't panic, and use the following tips to provide proper care.
Etapa 1: DO NOT place your fingers or any object in the dog's mouth.
Etapa 2: Pull the dog away from walls and furniture to prevent self-injury.
Etapa 3: Seizures can raise your dog's body temperature fast, so don't wrap the dog in a blanket or towel for comfort until the seizure is over. Instead, place cool washcloths on his feet to help keep his temperature from rising.
Etapa 4: After the seizure has stopped, contact your veterinarian for further instructions. You can now wrap your dog in a towel or blanket to comfort him after the seizure he's alert.
Etapa 5: If you're able to, time your dog's seizure. If it lasts less than 2 minutes, he should be OK but you should still consult with your veterinarian. If it lasts between 2 and 5 minutes, this is starting to hit the warning zone and you dog should take your dog to the vet as soon as possible. If the seizure lasts longer than 5 minutes, he needs to be treated by your veterinarian immediately.
A common ailment among most pets, diarrhea can become a serious problem if not treated properly. Turn to the next section for helpful tips.
How to Treat a Dog That Has Diarrhea
Diarrhea is a commonly encountered problem that occurs when food is passed through a dog's intestine too rapidly. It can be caused by allergies, milk, parasites, spoiled food, or bacterial infection. There are also more serious causes such as tumors; viral infections; and diseases of the liver, pancreas, and kidney.
Be sure to seek professional help if blood, severe depression, or abdominal pain are present in your pet. Otherwise, use the following suggestions to help ease a dog's discomfort.
Etapa 1: Remove all food for 12 to 24 hours. Water is important to prevent dehydration in severe diarrhea. It should not be removed.
Etapa 2: If blood appears or if diarrhea continues for more than 24 hours, contact the veterinarian. He or she will probably want to see a stool sample.
Etapa 3: After at least 12 hours, treat the dog by feeding it a bland diet such as boiled skinless chicken and rice (50:50 mixture). When stools begin to form, slowly phase back to regular diet. Kaopectate or Pepto-Bismol can be safely used in dogs. Call your veterinarian for the correct dosage for your pet.
When people think of animal bites, they usually think of a human being bit by a dog. But dogs can also be the victims of bites from dogs or other animals lurking in the backyard. Check the next section for first-aid tips when your dog experiences an animal bite.
How to Treat a Dog With an Animal Bite
When a dog gets into a fight with another dog, a cat, or a wild animal, damage can occur to both the skin and the underlying tissue. Many dogfights can be avoided by not permitting your dog to run loose and by keeping it on a leash when you walk it. The dog should also be trained to obey your commands.
If your dog does get into a fight, do not try to break it up with your bare hands. A fighting dog will bite anything in its way, including you. Pull your leashed dog out of harm's way or use a long stick. After the fight is over, examine your dog carefully for hidden wounds. You'll often find punctures around the neck area and on the legs. Olhe através do cabelo com cuidado para encontrar manchas de sangue, o que indicaria que a pele foi perfurada.
It is important to determine if the biting animal has been inoculated against rabies. If the biter is a wild animal such as a skunk or raccoon, efforts should be made to destroy it so the brain can be examined for rabies. Never touch the wild animal with your bare hands, even after it has been killed. Wear gloves or wrap the body in a blanket. Seu veterinário irá cuidar do exame de raiva.
To provide proper care to a dog suffering from an animal bite, use the following tips.
Etapa 1: Restrain the dog if necessary.
Etapa 1a: Approach the dog slowly, speaking in a reassuring tone of voice.
Etapa 1b: Slip a leash around the dog's neck, then place the leash around a fixed object. Pull the dog against this object and tie the leash so the dog cannot move its head.
Etapa 1c: Muzzle the dog to protect yourself.
Etapa 2: Clip the hair around the wound.
Etapa 3: Lave bem a ferida com água limpa. Avoid home antiseptics, which may cause pain when applied.
Etapa 4: Examine the wound. Se o tecido sob a ferida parecer passar quando você mover a pele, a ferida provavelmente precisará de pontos.
Etapa 5: DO NOT bandage. Deixe a ferida drenar, a menos que haja sangramento excessivo. Se a ferida sangrar excessivamente, siga estas etapas:
Etapa 5a: Cover wound with clean cloth, sterile dressing, or sanitary napkin.
Etapa 5b: Coloque a mão sobre o curativo e pressione com firmeza.
Etapa 5c: Mantenha pressão sobre o curativo para parar o sangramento.
Step 5d: If blood soaks through the dressing, DO NOT remove it. Aplique mais curativo e continue a aplicar pressão até que o sangramento pare.
Etapa 6: If the wound is deep enough to require stitches, transport the dog immediately to the veterinarian.
Etapa 7: Be sure to contact your veterinarian if your dog is not current on its rabies vaccination.
Dogs are natural swimmers, but situations can occur where a dog swims too far and starts drowning. Turn to the next section to find out how to best handle this type of emergency.
How to Save a Drowning Dog
Dogs are naturally good swimmers for short distances, but they can get into trouble. Sometimes they get too far from the shore and tire trying to swim back, or they fall into a swimming pool and cannot get up the steep sides.
Always protect yourself when trying to rescue a drowning dog. An extra few moments of preparation can save two lives -- yours and the dog's. Also be sure to watch for signs of shock, which include pale or white gums, a rapid heartbeat, or rapid breathing. Use the following tips when rescuing a drowning dog.
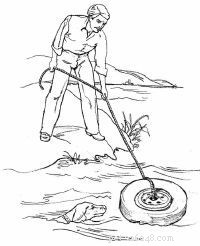
Etapa 1: Rescue the dog.
Etapa 1a: Holding the attached rope, throw a life preserver toward the dog. OU
Etapa 1b: Try to hook the dog's collar with a pole. OU
Etapa 1c: Row out to the dog in a boat. OU
Etapa 1d: As a last resort, swim to the dog. Protect yourself. Bring something for the dog to cling to or climb on and be pulled to shore.
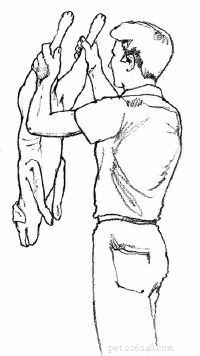
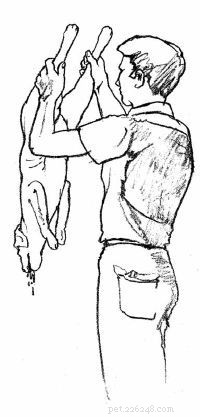
Etapa 2: Drain the dog's lungs.
Etapa 2a: If you can lift the dog, grasp the rear legs and hold the animal upside down for 15 to 20 seconds. Give 3 or 4 downward shakes to help drain fluid from its lungs.
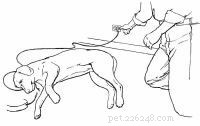
Etapa 2b: If you cannot lift the dog, place it on a sloping surface with its head low to facilitate drainage.
Etapa 3: If the dog is not breathing, feel for a heartbeat by placing your fingers about 2 inches behind the dog's elbow in the middle of its chest.
Etapa 4: If the heart is not beating, proceed to Step 5. If it is, perform artificial respiration.
Etapa 4a: Turn the dog on its side.
Etapa 4b: Extend the dog's head and neck. Hold the dog's mouth and lips closed and blow firmly into its nostrils. Administer 1 breath every 3 to 5 seconds. Take a deep breath, and repeat until you feel resistance or see the chest rise.
Etapa 4c: After 10 seconds, stop. Watch the dog's chest for movement to indicate it is breathing on its own.
Etapa 4d: If the dog is not breathing, continue artificial respiration.
Etapa 5: Se o coração não estiver batendo, faça a ressuscitação cardiopulmonar (RCP).
CPR for Dogs Weighing up to 45 Pounds
Etapa 5a: Turn the dog on its back.
Etapa 5b: Kneel down at the head of the dog.
Etapa 5c: Clasp your hands over the dog's chest with your palms resting on either side of its chest.
Step 5d: Compress your palms on the chest firmly for a count of "2," and release for a count of "1." Moderate pressure is required. Repeat about 60 to 90 times per minute.
Step 5e: Alternately (after 30 seconds), hold the dog's mouth and lips closed and blow firmly into its nostrils. Blow for 3 seconds, take a deep breath, and repeat until you feel resistance or see the dog's chest rise. Try to repeat this 10 to 20 times per minute. As a general rule, use a CPR ratio of about 5 heart compressions to 1 breath of air.
Step 5f: After 1 minute, stop. Look at the chest for breathing movement, and feel for a heartbeat by placing fingers about 2 inches behind the dog's elbow in the center of its chest.
Step 5g: If the dog's heart is not beating, continue CPR. If the heart starts beating, but the dog is still not breathing, return to Step 4.
CPR for Dogs Weighing More Than 45 Pounds
Etapa 5a: Turn the dog on its side.
Etapa 5b: Place the palm of your hand in the middle of the dog's chest.
Etapa 5c: Press for a count of "2," and release for a count of "1." Firm pressure is required. Repeat about 60 to 90 times per minute.
Step 5d: Alternately (after 30 seconds), hold the dog's mouth and lips closed and blow firmly into its nostrils. Blow for 3 seconds, take a deep breath, and repeat until you feel resistance or see the chest rise. Try to repeat this 10 to 20 times per minute.
Step 5e: After 1 minute, stop. Look at the chest for breathing movement, and feel for a heartbeat by placing your fingers about 2 inches behind the dog's elbow in the center of its chest.
Step 5f: If the dog's heart is not beating, continue CPR. If the heart starts beating but the dog is still not breathing, return to Step 4.
Etapa 6: Transport the dog immediately to the veterinarian. CPR or artificial respiration should be continued until the dog is breathing and its heart is beating without assistance.
Puppies love to chew -- and they rarely discriminate between what they chew and what they avoid. If your puppy gets a hold of an electrical cord, you may be faced with treating electrical shock. Check the next section for tips on dealing with this type of pet emergency.
How to Treat a Dog in Electrical Shock
Grown dogs are seldom victims of electrical shock. But puppies are naturally curious and will chew almost anything, including electrical cords. If the insulation is punctured and the mouth comes in contact with both wires, the dog will receive a shock and may be unable to release the cord.
Electrocution can cause severe heart damage and fluid accumulation in the lungs. Strong shock can stop the heart, and CPR will need to be performed immediately to start the heart beating again. In addition, the dog's mouth will likely be burned from contact with the bare wires. Be sure to watch for signs of shock, which include pale or white gums, a rapid heartbeat, or rapid breathing.
To provide the proper care for your pet who is suffering from electrical shock, use the following tips.
Etapa 1: If the dog still has the electrical cord in its mouth, DO NOT touch the dog. First remove the plug from its outlet.
Etapa 2: If the dog is unconscious, check for breathing. If the dog is conscious and breathing, proceed to Step 6. If the dog is not breathing, feel for a heartbeat by placing your fingers about 2 inches behind the elbow in the middle of its chest.
Etapa 3: If the heart is not beating, proceed to Step 4. If it is, perform artificial respiration.
Etapa 3a: Turn the dog on its side, and extend its head and neck.

Etapa 3b: Hold the dog's mouth and lips closed and blow firmly into its nostrils. Administer 1 breath every 3 to 5 seconds. Take a deep breath, and repeat until you feel resistance or see the chest rise.
Step 3c: After 10 seconds, stop. Watch the dog's chest for movement to indicate the dog is breathing on its own.
Step 3d: If the dog is not breathing, continue artificial respiration.
Etapa 4: If the heart is not beating, perform CPR.
CPR for Dogs Weighing up to 45 Pounds
Etapa 4a: Turn the dog on its back.
Etapa 4b: Kneel down at the head of the dog.
Etapa 4c: Clasp your hands over the dog's chest with your palms resting on either side of its chest.
Etapa 4d: Compress your palms on the chest firmly for a count of "2," and release for a count of "1." Moderate pressure is required. Repeat about 60 to 90 times per minute.
Etapa 4e: Alternately (after 30 seconds), hold the dog's mouth and lips closed and blow firmly into its nostrils. Blow for 3 seconds, take a deep breath, and repeat until you feel resistance or see the dog's chest rise. Try to repeat this 10 to 20 times per minute. As a general rule, use a CPR ratio of about 5 heart compressions to 1 breath of air.
Etapa 4f: After 1 minute, stop. Look at the chest for breathing movement, and feel for a heartbeat by placing fingers about 2 inches behind the dog's elbow in the center of its chest.
Etapa 4g: If the dog's heart is not beating, continue CPR. If the heart starts beating, but the dog is still not breathing, return to Step 3.
CPR for Dogs Weighing More Than 45 Pounds
Etapa 4a: Turn the dog on its side.
Etapa 4b: Place the palm of your hand in the middle of the dog's chest.
Etapa 4c: Press for a count of "2," and release for a count of "1." Firm pressure is required. Repeat about 60 to 90 times per minute.
Etapa 4d: Alternately (after 30 seconds), hold the dog's mouth and lips closed and blow firmly into its nostrils. Blow for 3 seconds, take a deep breath, and repeat until you feel resistance or see the chest rise. Try to repeat this 10 to 20 times per minute.
Etapa 4e: After 1 minute, stop. Look at the chest for breathing movement, and feel for a heartbeat by placing your fingers about 2 inches behind the dog's elbow in the center of its chest.
Etapa 4f: If the dog's heart is not beating, continue CPR. If the heart starts beating but the dog is still not breathing, return to Step 3.
Etapa 5: Transport the dog immediately to the veterinarian. CPR or artificial respiration should be continued until the dog is breathing and its heart is beating without assistance.
Etapa 6: If the dog's mouth or lips are burned (bright red), swab them gently with 3% hydrogen peroxide.
Etapa 7: To conserve body heat, wrap the dog in a blanket or jacket.
Just like humans, dogs often have problems with their eyes due to dust, allergies, and other culprits. See the next page for tips on dealing with eye injuries.
How to Treat a Dog With Eye Injuries
Irritation of the eye in a dog can be caused by allergies, dust and dirt, lashes growing inward, fights, and more. It can result in a mild inflammation of the tissue around the eye (conjunctivitis) or severe damage to the cornea.
When examining a dog's eye, it is important to know that dogs have a third eyelid located in the corner of the eye nearest the nose. Esta terceira pálpebra pode cobrir completamente o globo ocular e às vezes dá a impressão de que parte do olho desapareceu.
In addition to being a protective mechanism, the third eyelid can indicate that something is wrong with the eye. Se estiver elevado e parecer vermelho, o olho está inflamado. Do not try to touch or manipulate this eyelid.
Other indications that a dog's eye is irritated are squinting and rubbing and pawing at the eye. Your first priority is to prevent your pet from further injuring itself since this often causes more severe damage than the original irritation. Use the following tips to treat your dog's eye injuries.
Object in the Eye
Etapa 1: DO NOT try to remove the object.
Etapa 2: Restrain the dog if necessary.
Etapa 2a: Approach the dog slowly, speaking in a reassuring tone of voice.
Etapa 3: Prevent self-injury to the eye.
Etapa 3a: Dewclaws (if present) should be bandaged on the front paw on the same side as the affected eye.
Etapa 3b: For small dogs, cut a large piece of cardboard into an Elizabethan-type collar.

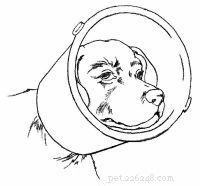
Step 3c: For larger dogs, cut the bottom from a plastic bucket, fit the bucket over the dog's head, and hold it in place by tying it to the dog's collar.
Etapa 4: Transport the dog immediately to the veterinarian.
Scratched or Irritated Eye
The typical signs of a scratched or irritated eye include squinting; rubbing or pawing at the eyes; or thick discharge or redness in the eye.
Etapa 1: Restrain the dog if necessary.
Etapa 1a: Approach the dog slowly, speaking in a reassuring tone of voice.
Etapa 2: Flush the dog's eye thoroughly with saline solution or plain water.
Etapa 3: Prevent self-injury to the eye.
Etapa 3a: Dewclaws (if present) should be bandaged on the front paw on the same side as the affected eye.
Etapa 3b: For small dogs, cut a large piece of cardboard into an Elizabethan-type collar.
Step 3c: For larger dogs, cut the bottom from a plastic bucket, fit the bucket over the dog's head, and hold it in place by tying it to the dog's collar.
Etapa 4: Transport the dog immediately to the veterinarian.
A dog can be sensitive to extreme cold, especially its ears and the tip of its tail. If you suspect your pet is suffering from frostbite, take note of the first-aid tips on the next page.
How to Treat a Dog That Has Frostbite
When a dog is exposed to freezing temperatures for a long period of time, there is always the possibility of frostbite. The signs of frostbite include pain, pale skin in early stages, and red or black skin in advanced stages.
The areas most likely to be frostbitten are those that have little or no hair and the ears and tail tip, which have a limited blood supply. Occasionally, if damage from frostbite is severe, part of the tail or ear tips may actually fall off. Professional attention should be sought before this happens. To provide proper care to a dog suffering from frostbite, use the following tips.
Etapa 1: Restrain the dog if necessary.
Etapa 1a: Approach the dog slowly, speaking in a reassuring tone of voice.
Etapa 1b: Slip a leash around the dog's neck, then place the leash around a fixed object. Pull the dog against this object and tie the leash so the dog cannot move its head.
Etapa 1c: Muzzle the dog to protect yourself, if necessary.
Etapa 2: Aqueça a área com toalhas úmidas. The water temperature should be warm but not hot (75 degrees Fahrenheit/24 degrees Celsius). DO NOT use ointment.
Etapa 3: If the skin turns dark, transport the dog to the veterinarian as soon as possible.
Just as exposure to extreme cold can be harmful to your pet, so, too, can extreme heat. Check the next section to learn how to treat a dog that has heatstroke.
How to Treat a Dog That Has Heatstroke
Heatstroke is caused by the inability of the body to maintain its normal temperature because of the environmental heat. It is often caused by keeping a dog in a locked car parked in the sun or by keeping it in any hot area without adequate ventilation.
The signs of heatstroke are excessive drooling, lack of coordination, rapid breathing, and a top of the head that is hot to the touch. Prompt treatment is urgent. Body temperatures often get as high as 107 degrees Fahrenheit/41.5 degrees Celsius, and without quick cooling, severe brain damage and death will occur.
Heatstroke can be prevented by making sure your dog has plenty of shade and ventilation. If you must take your dog driving with you, park in the shade and leave all the windows partially open.
Should heatstroke occur, use the following suggestions to help you provide your dog with the utmost care.
Etapa 1: Remove the dog from the hot environment.
Etapa 2: Immerse the dog in a cold water bath or continuously run a garden hose on its body; continue either treatment for at least 30 minutes.
Etapa 3: Apply ice packs to the top of the head; keep them there while transporting the dog to the veterinarian.
Etapa 4: Transport the dog to the veterinarian immediately after the above treatment.
Another pet injury that requires immediate professional treatment is hypothermia. Check the next page for tips on what to do if you suspect your pet is suffering from this condition.
How to Treat a Dog That Has Hypothermia
Exposure to either cold water or freezing temperatures can cause hypothermia, or subnormal body temperatures. A dog's survival will depend on how low its body temperature drops.
A dog's normal body temperature is 100 to 101 degrees Fahrenheit/38 degrees Celsius. If it drops below 90 degrees Fahrenheit/32 degrees Celsius for any length of time, normal bodily functions will be severely impaired.
The signs of hypothermia include depression, subnormal body temperature, and coma. This condition always requires veterinary attention as soon as possible. Use the following tips to help you provide proper care to a dog suffering from hypothermia.
Etapa 1: Warm the dog.
Etapa 1a: Place a hot water bottle (100 degrees Fahrenheit/37 degrees Celsius) against the dog's abdomen. Wrap the bottle in a cloth to prevent burns. Wrap the dog in a blanket or jacket.
Etapa 2: Transport the dog immediately to the veterinarian.
Just like humans, dogs can be allergic to insect bites, so it's important to know the warning signs. Learn more about treating insect stings on the next page.
How to Treat a Dog With an Insect Bite or Sting
While most insect bites to a dogwill be uneventful, if your pet has been stung by a bee, wasp, yellow jacket, or hornet, the area will quickly become swollen and somewhat painful. A possible allergic reaction to the venom deposited by the insect is the most serious problem.
The signs of an insect bite include swelling, pain in the muscles and affected area, vomiting, weakness, fever, and shock. The signs of shock are pale or white gums, a rapid heartbeat, or rapid breathing. Below are helpful suggestions on what to do if your pet has been stung by a pest.
Etapa 1: Restrain the dog if necessary.
Etapa 1a: Approach the dog slowly, speaking in a reassuring tone of voice.
Etapa 1b: Muzzle the dog to protect yourself, if necessary.
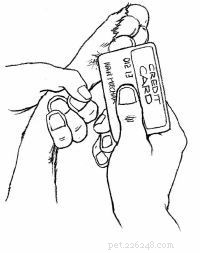
Etapa 2: DO NOT pinch the area. If the dog has been stung by a bee, scrape the stinger off immediately with a credit card or dull knife. Other insects do not leave the stinger in the skin.
Etapa 3: If the affected area is swollen and hot, apply cortisone cream and hold ice on the dog's skin for a short time.
Etapa 4: Administer antihistamine such as diphenhydramine (Benadryl) orally at a dose of 1mg per pound of body weight (e.g., a 25-pound dog would get 25mg pill or capsule).
Etapa 5: If the dog experiences any difficulty breathing or if its face seems swollen, transport the dog immediately to the veterinarian.
Did you know your house is filled with products that are poisonous to your beloved pet? Check the next page to find out what they are and what to do if your dog gets a hold of one of these harmful substances.
How to Treat a Poisoned Dog
Dogs are curious creatures and like to investigate, which leads to many accidental poisonings each year. Often a dog will find an open can or bottle of some chemical and, accidentally or on purpose, spill it. Naturally the chemical gets on its fur and paws, and while licking the area clean, it swallows the possibly toxic substance. It is your responsibility as a pet owner to keep all potentially toxic products tightly closed and out of your dog's reach.
Some of the signs of a possible poisoning include excessive drooling, vomiting, diarrhea, abdominal pain, twitching, nervousness, convulsions, coma, and a chemical odor on the body. Here's what you can do if your dog is poisoned:
Etapa 1: If the dog is comatose or convulsing, wrap it in a blanket and transport your pet immediately to the veterinarian with the suspect poison container, plant, or leaf.
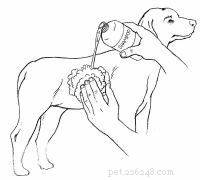
Etapa 2: If the dog has a chemical odor on its skin, wash the entire dog with mild soap until the odor is gone. If the poison was licked or ingested, flushing the dog's mouth with clean water may also help in decontamination.
Etapa 3: If the dog has not already vomited and the poison is not a caustic or petroleum product (see lists below), induce vomiting by giving 1 tablespoon of 3% hydrogen peroxide per 20 pounds every 10 minutes until vomiting starts. If no vomiting occurs within 30 minutes, transport the dog immediately to the veterinarian with the suspected poison container.
Etapa 4: Call the Pet Poison Control hotline for further instructions at 888-426-4435. (Há uma taxa para este serviço.)
Caustics include battery acid, corn and callous remover, dishwashing detergent, drain cleaner, grease remover, lye, and oven cleaner. Os produtos petrolíferos incluem solvente de tinta, cera de piso e solução de limpeza a seco.
You might be surprised by the number of household items that are poisonous to your dog. Some of the most common are alcoholic beverages, ammonia, antifreeze, bleach, chocolate (baking chocolate is the worst), detergents, disinfectants, dry-cleaning solution, fertilizer, furniture polish, gasoline, glue, grapes and raisins, human medications, mothballs, mouse and rat poison, onions, oven cleaners, paint thinner and remover, shoe polish, silver polish, and toilet bowl cleaner.
In addition, some household plants are toxic to your pet, including aloe vera, amaryllis, avocado, azalea, bird of paradise, calla lily, castor bean, corn plant, cyclamen, daffodil, day lily, dieffenbachia, Easter lily, elephant ears, English ivy, gladiolus, holly, hyacinth, hydrangea, iris, kalanchoe, macadamia nut, mistletoe, narcissus, onion, philodendron, poinsettia, rhododendron, tomato plant, tulip, yew, and yucca.
(This is only a partial list. For a more complete listing, refer to the ASPCA Animal Poison Center at www.aspca.org.)
Dogs can also become poisoned from smoke or carbon monoxide. Check the next section for tips on what to do in this first-aid emergency.
How to Treat a Dog That Has Smoke or Carbon Monoxide Inhalation

Fires are another possible threat to dogs. Do not risk your own life to save your dog. Leave that task to the firefighters or those trained in rescue.
The signs of smoke or carbon monoxide inhalation include depression, lack of coordination, heavy panting, deep red gums, and possible convulsions. Also watch for signs of shock, which are pale or white gums, a rapid heartbeat, or rapid breathing.
If suspect your pet is suffering from smoke or carbon monoxide inhalation, use the following tips to provide the dog with proper care.
If the Dog Is Conscious
Etapa 1: Remove the dog from the area and into fresh air immediately.
Etapa 2: Flush the dog's eyes thoroughly with saline solution or clean water.
Etapa 3: Transport the dog immediately to the veterinarian.
If the Dog Is Unconscious
Etapa 1: Remove the dog from the area and into fresh air immediately.
Etapa 2: If the dog is not breathing, feel for a heartbeat by placing your fingers about 2 inches behind the dog's elbow in the middle of its chest.
Etapa 3: If the heart is not beating, proceed to Step 4. If it is, perform artificial respiration.
Etapa 3a: Turn the dog on its side.
Etapa 3b: Hold the dog's mouth and lips closed and blow firmly into its nostrils. Administer 1 breath every 3 to 5 seconds. Take a deep breath, and repeat until you feel resistance or see the dog's chest rise.
Step 3c: After 1 minute, stop. Watch the chest for movement to indicate the dog is breathing on its own.
Step 3d: If the dog is not breathing, continue artificial respiration.
Etapa 4: Se o coração não estiver batendo, faça a ressuscitação cardiopulmonar (RCP).
CPR for Dogs Weighing up to 45 Pounds
Etapa 4a: Turn the dog on its back.
Etapa 4b: Kneel down at the head of the dog.
Etapa 4c: Clasp your hands over the dog's chest with your palms resting on either side of its chest.
Etapa 4d: Compress your palms on the chest firmly for a count of "2," and release for a count of "1." Moderate pressure is required. Repeat about 60 to 90 times per minute.
Etapa 4e: Alternately (after 30 seconds), hold the dog's mouth and lips closed and blow firmly into its nostrils. Blow for 3 seconds, take a deep breath, and repeat until you feel resistance or see the dog's chest rise. Try to repeat this 10 to 20 times per minute. As a general rule, use a CPR ratio of about 5 heart compressions to 1 breath of air.
Etapa 4f: After 1 minute, stop. Look at the chest for breathing movement, and feel for a heartbeat by placing your fingers about 2 inches behind the dog's elbow in the center of its chest.
Etapa 4g: If the dog's heart is not beating, continue CPR. If the heart starts beating, but the dog is still not breathing, return to Step 3.
CPR for Dogs Weighing More Than 45 Pounds
Etapa 4a: Turn the dog on its side.
Etapa 4b: Place the palm of your hand in the middle of the dog's chest.
Etapa 4c: Press for a count of "2," and release for a count of "1." Firm pressure is required. Repeat about 60 to 90 times per minute.
Etapa 4d: Alternately (after 30 seconds), hold the dog's mouth and lips closed and blow firmly into its nostrils. Blow for 3 seconds, take a deep breath, and repeat until you feel resistance or see the chest rise. Try to repeat this 10 to 20 times per minute.
Etapa 4e: After 1 minute, stop. Look at the chest for breathing movement, and feel for a heartbeat by placing your fingers about 2 inches behind the dog's elbow in the center of its chest.
Etapa 4f: If the dog's heart is not beating, continue CPR. If the heart starts beating but the dog is still not breathing, return to Step 3.
Etapa 5: Transport the dog immediately to the veterinarian. CPR or artificial respiration should be continued on the way to the veterinarian or until the dog is breathing and its heart is beating without assistance.
A puncture wound can be quite painful and traumatic for a dog. In the next section, we'll learn how to treat this type of injury.
How to Help a Dog That Has a Puncture Wound
A puncture wound on a dog may be difficult to see because it is often covered with hair. Since the most common location for a puncture wound is the bottom of the paw, the first sign may be a limp. Slightly blood-tinged fur is a common sign of a puncture wound on other parts of the body.
If you suspect your dog has a puncture wound, be sure to watch for signs of shock, which include pale or white gums, a rapid heartbeat, or rapid breathing. The following tips will help you treat your wounded pet.
If the Object Is Protruding
Etapa 1: Restrain the dog if necessary, taking care not to touch the object.
Etapa 1a: Approach the dog slowly, speaking in a reassuring tone of voice.
Etapa 1b: Slip a leash around the dog's neck, then place the leash around a fixed object. Pull the dog against this object and tie the leash so the dog cannot move its head.
Etapa 1c: Muzzle the dog to protect yourself if necessary.
Etapa 2: DO NOT attempt to remove the object.
Etapa 3: Place clean cloths, sterile dressings, or sanitary napkins around the point of entry.
Etapa 4: Bandage tightly around the point of entry.
Etapa 5: Transport the dog immediately to the veterinarian.
Other Puncture Wounds

Etapa 1: Restrain the dog if necessary.
Etapa 1a: Approach the dog slowly, speaking in a reassuring tone of voice.
Etapa 2: If the wound is in the chest and a "sucking" noise is heard, bandage tightly enough to seal the wound, and transport the dog immediately to the veterinarian.
Etapa 3: If the wound is not in the chest, clip the hair around the wound.

Etapa 4: Examine the wound carefully for foreign objects. If present, remove the object with tweezers or needle-nose pliers.
Etapa 5: Lave bem a ferida com água limpa. Avoid home antiseptics, which may cause pain when applied.
Etapa 6: DO NOT bandage. Deixe a ferida drenar, a menos que haja sangramento excessivo. Se a ferida sangrar excessivamente, siga estas etapas:
Step 6a: Cover wound with clean cloth, sterile dressing, or sanitary napkin.
Step 6b: Coloque a mão sobre o curativo e pressione com firmeza.
Step 6c: Mantenha pressão sobre o curativo para parar o sangramento.
Step 6d: If blood soaks through the dressing, DO NOT remove it. Aplique mais curativo e continue a aplicar pressão até que o sangramento pare.
Etapa 7: If the bleeding does not stop within 5 minutes, continue to apply pressure on the wound while transporting the dog to the veterinarian.
Knowing how to identify the signs of shock and how to treat it will help you in many pet first-aid situations. In the next section, learn about proper care for dogs experiencing shock.
How to Treat a Dog in Shock
Shock is extremely serious; it is the No. 1 killer in accidents. Shock is a reaction to heavy internal or external bleeding or any serious injury that "scares" the body; for example, a large wound or amputation with heavy blood loss. The body tries to compensate for the loss by speeding up the heart rate to keep the blood pressure from falling. At the same time the blood vessels that supply the outside of the body narrow. This is to conserve blood so vital organs of the body can continue to receive their normal blood supply.
However, if there is heavy blood loss or other serious injury, the body overreacts and causes a pooling of blood in the internal organs. This can cause death due to a drop in external blood pressure and possible oxygen starvation of the brain.
The signs of shock include pale or white gums, a rapid faint heartbeat, rapid breathing, or below-normal body temperature (feels cold). If your dog is in shock, use the following tips to provide proper first aid.
Etapa 1: Examine the dog for shock.
Etapa 1a: Examine the gums by gently lifting the dog's upper lip so the gum is visible. Pale or white gums indicate the dog is almost certainly in shock and may have serious internal injuries and/or bleeding. If the gums are pink, the dog is probably not in shock.
Etapa 1b: Determine the dog's heartbeat. Place your fingers firmly on the dog about 2 inches behind the dog's elbow in the center of its chest. Count the number of beats in 10 seconds and multiply by 6. If the dog is in shock its heartbeat may be more than 150 beats per minute.
Etapa 2: Place the dog on its side with its head extended.
Etapa 3: Gently pull out the dog's tongue to keep the airway open.
Etapa 4: Elevate the dog's hindquarters slightly by placing them on a pillow or folded towels.
Etapa 5: Stop visible bleeding immediately. If blood is spurting and the wound is on the leg or tail, proceed to Step 6.
Etapa 5a: Cubra a ferida com um pano limpo, curativo estéril ou absorvente higiênico.
Etapa 5b: Coloque a mão sobre o curativo e pressione com firmeza.
Etapa 5c: Mantenha a pressão sobre o curativo para parar o sangramento. If blood soaks through the dressing, DO NOT remove it. Aplique mais curativo e continue a aplicar pressão até que o sangramento pare. If bleeding does not stop within 5 minutes, continue to apply pressure on the wound while transporting the dog to the veterinarian.
Step 5d: Wrap torn rags or other soft material around the dressing and tie or tape it just tightly enough to keep the bandage on. Comece abaixo da ferida e enrole para cima.
Etapa 6: If bleeding does not stop within 5 minutes, transport the dog immediately to the veterinarian.
Etapa 7: To conserve body heat, wrap the dog in a blanket or jacket.
A dog's encounter with a skunk is not only smelly, but it can also be dangerous, since skunks are a major carrier of rabies. Turn to the next page to find out what to do if your pet has been sprayed by a skunk.
How to Treat a Dog That Has Been Sprayed by a Skunk
Skunks are one of the major carriers of rabies in North America. Therefore, a dog's encounter with a skunk should be treated as more than just a stinky situation. Use the following suggestions to provide proper care for your pet.
Etapa 1: Restrain the dog if necessary.
Etapa 1a: Approach the dog slowly, speaking in a reassuring tone of voice.
Etapa 1b: Slip a leash around the dog's neck, then place the leash around a fixed object. Pull the dog against this object and tie the leash so the dog cannot move its head.
Etapa 1c: Muzzle the dog to protect yourself.
Etapa 2: Flush the dog's eyes with fresh water.
Etapa 3: Remove and destroy leather collars or harnesses.
Etapa 4: Bathe the dog thoroughly with soap or shampoo and water. Repeat several times.

Etapa 5: Apply plain tomato juice liberally. After several minutes, bathe the dog again with soap or shampoo and water. Time will eventually remove the odor. Skunk odor neutralizers are available.
Etapa 6: If the skunk is destroyed, take it to the veterinarian for a rabies examination. DO NOT touch the skunk with your bare hands.
Etapa 7: If the dog is not currently vaccinated for rabies, contact the veterinarian.
An encounter with a snake can also create a pet emergency situation. See the next section for how to treat snakebites.
How to Treat a Dog That Has a Snakebite
Poisonous snakebites are rare in North America. Most snakes are nonpoisonous, and neither poisonous nor nonpoisonous snakes will attack a dog unless provoked. But many pets are curious, and bites will occur.
If you live in or visit a snake-inhabited area, you can expect problems if you let your dog run loose. Be prepared by reading the following tips for treating snakebites.
Poisonous
The signs of a poisonous snakebite are two fang marks, pain, swelling, vomiting, difficulty breathing, and possible paralysis and convulsions. Be sure to watch for sings of shock, which include pale or white gums, a rapid heartbeat, or rapid breathing.
Treatment must begin as soon as possible after the bite. If the snake was killed, bring it to the veterinarian for identification. Otherwise, try to remember identifying marks.
Etapa 1: Restrain the dog if necessary.
Etapa 1a: Approach the dog slowly, speaking in a reassuring tone of voice.
Etapa 1b: Slip a leash around the dog's neck, then place the leash around a fixed object. Pull the dog against this object and tie the leash so the dog cannot move its head.
Etapa 1c: Muzzle the dog to protect yourself if necessary.
Etapa 2: Clip the hair from the bite area.
Etapa 3: Flush thoroughly by pouring 3% hydrogen peroxide directly on the bite.
Etapa 4: Transport the dog immediately to the veterinarian.
Nonpoisonous
The signs of a nonpoisonous snakebite are a U-shape bite and pain in the bite area. If you are not sure the snake is nonpoisonous, treat as poisonous. Veja acima.
Etapa 1: Restrain the dog if necessary.
Etapa 1a: Approach the dog slowly, speaking in a reassuring tone of voice.
Etapa 1b: Slip a leash around the dog's neck, then place the leash around a fixed object. Pull the dog against this object and tie the leash so the dog cannot move its head.
Etapa 1c: Muzzle the dog to protect yourself, if necessary.
Etapa 2: Clip the hair from the bite area.
Etapa 3: Flush thoroughly by pouring 3% hydrogen peroxide directly on the bite.
Various injuries may cause unconsciousness in a dog. Turn to the next section for tips on what to do in this emergency situation.
How to Treat an Unconscious Dog
Your first priority when dealing with an unconscious dog is to get the heart beating and the dog breathing. Also be sure to watch for signs of shock, which include pale or white gums, a rapid heartbeat, or rapid breathing. Use the following tips to provide proper treatment to a dog that has lost consciousness.
Etapa 1: If you suspect choking, clear the dog's airway. If the dog is not choking, proceed to
Passo 2.
Etapa 1a: Open the dog's mouth carefully by grasping the upper jaw with one hand over the muzzle.
Etapa 1b: Press the dog's lips over the upper teeth by pressing your thumb on one side and your fingers on the other so that the lips are between the dog's teeth and your fingers. Apply firm pressure to force the mouth open.
Etapa 1c: If you can see the object, try to remove it with your fingers.
Etapa 1d: If you cannot remove the object and the dog is small enough, pick it up by grasping its back legs; turn it upside down and shake vigorously. Slapping its back while shaking may help to dislodge the object.
Step 1e: If you cannot remove the object and the dog is too large to pick up, place the dog on its side on the floor. Place your hand just behind the rib cage and press down and slightly forward quickly and firmly. Liberar. Repeat rapidly several times until the object is expelled.
Step 1f: If you cannot dislodge the object, transport the dog immediately to the veterinarian.
Etapa 2: If the dog is breathing, check for shock. If the dog is not breathing, proceed to Step 3.
Etapa 2a: Examine the gums by gently lifting the upper lip so the gum is visible. Pale or white gums indicate the dog is almost certainly in shock and may have serious internal injuries and/or bleeding. If the gums are pink, the dog is probably not in shock.
Etapa 2b: Determine the heartbeat. Place fingers firmly on the dog about 2 inches behind the dog's elbow in the center of its chest. Count the number of beats in 10 seconds and multiply by 6. If the dog is in shock its heartbeat may be more than 150 beats per minute.
Etapa 2c: Place the dog on its side with its head extended. Gently pull out the dog's tongue to keep the airway open.
Etapa 2d: Elevate the dog's hindquarters slightly by placing them on a pillow or folded towels. To conserve body heat, wrap the dog in a blanket or jacket.
Step 2e: Transport the dog immediately to the veterinarian.
Etapa 3: Feel for a heartbeat by placing your fingers about 2 inches behind the dog's elbow in the middle of its chest.

Etapa 4: If the dog's heart is not beating, proceed to Step 5. If it is, perform artificial respiration.
Etapa 4a: Turn the dog on its side.
Etapa 4b: Hold the dog's mouth and lips closed and blow firmly into its nostrils. Administer 1 breath every 3 to 5 seconds. Take a deep breath, and repeat until you feel resistance or see the dog's chest rise.
Etapa 4c: After 10 seconds, stop. Watch the chest for movement to indicate the dog is breathing on its own.
Etapa 4d: If the dog is not breathing, continue artificial respiration.
Etapa 5: If the heart is not beating, perform CPR.
CPR for Dogs Weighing up to 45 Pounds
Etapa 5a: Turn the dog on its back.
Etapa 5b: Kneel down at the head of the dog.
Etapa 5c: Clasp your hands over the dog's chest with your palms resting on either side of its chest.
Step 5d: Compress your palms on the chest firmly for a count of "2," and release for a count of "1." Moderate pressure is required. Repeat about 60 to 90 times per minute.
Step 5e: Alternately (after 30 seconds), hold the dog's mouth and lips closed and blow firmly into its nostrils. Blow for 3 seconds, take a deep breath, and repeat until you feel resistance or see the dog's chest rise. Try to repeat this 10 to 20 times per minute. As a general rule, use a CPR ratio of about 5 heart compressions to 1 breath of air.
Step 5f: After 1 minute, stop. Look at the chest for breathing movement, and feel for a heartbeat by placing your fingers about 2 inches behind the dog's elbow in the center of its chest.
Step 5g: If the dog's heart is not beating, continue CPR. If the heart starts beating, but the dog is still not breathing, return to Step 4.
CPR for Dogs Weighing more than 45 Pounds
Etapa 5a: Turn the dog on its side.
Etapa 5b: Place the palm of your hand in the middle of the dog's chest.
Etapa 5c: Press for a count of "2," and release for a count of "1." Firm pressure is required. Repeat about 60 to 90 times per minute.
Step 5d: Alternately (after 30 seconds), hold the dog's mouth and lips closed and blow firmly into its nostrils. Blow for 3 seconds, take a deep breath, and repeat until you feel resistance or see the chest rise. Try to repeat this 10 to 20 times per minute.
Step 5e: After 1 minute, stop. Look at the chest for breathing movement, and feel for a heartbeat by placing your fingers about 2 inches behind the dog's elbow in the center of its chest.
Step 5f: If the dog's heart is not beating, continue CPR. If the heart starts beating but the dog is still not breathing, return to Step 4.
Etapa 6: Transport the dog immediately to the veterinarian. CPR or artificial respiration should be continued on the way to the veterinarian or until the dog is breathing and its heart is beating without assistance.
Like diarrhea, vomiting is not necessarily a serious problem unless a dog becomes dehydrated. Check the next page for tips on what potential problems to look for.
How to Treat a Vomiting Dog
Vomiting is one of the most commonly encountered problems in veterinary medicine. It is nature's way of permitting the dog to rid its stomach of an irritating substance such as spoiled food.
But not all vomiting is due to simple irritation. More serious causes are viral infections or diseases of the liver, pancreas, or kidney. It is important to seek professional help if there are signs of bleeding or if the dog is depressed and still vomiting after initial efforts at control have failed. Here are some tips for treating a vomiting dog:
Etapa 1: Remove all food and water for at least 12 to 24 hours.
Etapa 2: If vomiting contains blood or is frequent, contact the veterinarian immediately. If not, proceed to Step 3.
Etapa 3: After 12 to 24 hours of no vomiting, introduce water gradually at 1 to 2 ounces at a time. If no vomiting occurs, offer a bland diet of boiled skinless chicken and rice (50:50 mixture). If this is held down, transition to regular diet over the next 2 days by mixing an increasing quantity of regular dog food with bland diet.
Etapa 4: Pepto-Bismol can be safely used for dogs. Call the veterinarian for recommended dose.
A dog giving birth to puppies can be quite an amazing experience -- for both the dog and its owner. Turn to the next page to learn how to be prepared to help a dog if problems occur during the birth process.
How to Help a Dog That Is Having Puppies
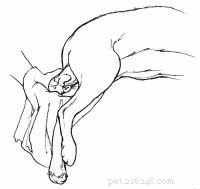
A dog's normal length of pregnancy (gestation period) is 61 to 63 days. However, delivery 1 or 2 days earlier or later is not unusual and presents no cause for alarm as long as the general health of the dog is good.
In preparation for whelping, the dog will make a nest with newspapers and rags if they are available. If they are not, she may dig into the carpeting with her front paws, almost as if she were digging a hole. This is termed "nest building" and is a fairly consistent sign that delivery will follow soon, usually within 2 to 3 days. To make your pet feel comfortable about delivering (and to save your carpet!) provide a whelping box with plenty of newspapers and rags.
At about the same time the nest building occurs, you should also notice an enlargement of the breasts with milk production. Another fairly consistent method of determining when the dog will deliver is to take her temperature each day. Approximately 24 hours before delivery, her temperature will drop about 2 degrees Fahrenheit/1 degree Celsius.
When she is getting close to labor, a mucous discharge appears at the vulva followed by a greenish discharge. At no time should there be a brown or foul-smelling discharge. If this is present, contact your veterinarian immediately.
The onset of labor will make the dog somewhat restless, but it is not until the second stage of labor that she will actually lie down and have abdominal contractions. Once the second stage of labor begins, delivery should begin within 3 hours. If no pups are delivered by that time, professional help should be obtained.
A puppy may be born in one of three ways. The most common presentation is head and feet first. The second most common is rear legs and tail first, not to be confused with a true breech birth. In a true breech only the rump is presented, with the rear legs folded under the body of the puppy. In a small bitch, this type of presentation can cause problems and should be watched for carefully.
Complications may arise during the birthing process that you can handle quite easily by using the tips below.
If the Puppy Is Stuck in the Birth Canal Half Exposed
Etapa 1: Grasp the puppy with a clean towel.
Etapa 2: Applying steady traction, gently pull the puppy at a slight downward angle. Continue pulling gently and steadily until the pup is delivered.
Etapa 3: If you are unable to remove the puppy, contact the veterinarian immediately.
If the Mother Doesn't Clean the Puppy After Delivery
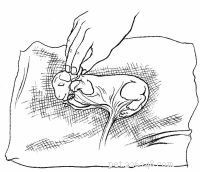
Etapa 1: Put the pup, covered in the fetal membrane, on a clean towel.
Etapa 2: Peel the membrane off its face immediately.
Etapa 3: Continue to pull the membrane from its body. The membrane will collect around the umbilical cord. DO NOT pull on the umbilical cord.
Etapa 4: Wipe any fluid off the nostrils and mouth. Rub the puppy's body vigorously with a towel to stimulate breathing.
Etapa 5: If there is heavy mucus in the mouth and nose, clean out what you can with your finger.
Etapa 6: If the puppy is still having trouble breathing:
Step 6a: Place the puppy in a towel on the palm of your hand.
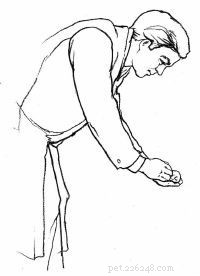
Step 6b: Cradle its head by closing your thumb toward your fingers.
Step 6c: Using your other hand to secure the puppy, lift your hands to head level and swing firmly down toward the floor. Repeat several times.
Step 6d: Vigorously rub the puppy again with the towel.
Step 6e: Stop when the puppy is actively moving and crying.
Etapa 7: Tie a thread around the umbilical cord about 1 inch above the puppy's abdomen. Leaving the tied portion attached to the puppy, cut off the rest of the umbilical cord and fetal membrane.
Etapa 8: Place the puppy with its mother. She will take care of the rest. If she does not take care of the puppies, or if any other problem develops, contact the veterinarian as soon as possible.
Seeing a dog hurt or in distress can be such a helpless feeling. By learning the tips outlined in this article, you can arm yourself with dozens of first-aid techniques that may end up saving the life of your beloved pet.
Publicações Internacional, Ltda.